
-
Welcome to the new SAOCA website. Already a member? Simply click Log In/Sign Up up and to the right and use your same username and password from the old site. If you've forgotten your password, please send an email to membership@sunbeamalpine.org for assistance.
If you're new here, click Log In/Sign Up and enter your information. We'll approve your account as quickly as possible, typically in about 24 hours. If it takes longer, you were probably caught in our spam/scam filter.
Enjoy.
You are using an out of date browser. It may not display this or other websites correctly.
You should upgrade or use an alternative browser.
You should upgrade or use an alternative browser.
Fuel Tank Sending Unit
- Thread starter Thor 1211
- Start date
Kevin,
The wire wound resistor is certainly whatt I had assumed. Regarding ground thru the spring, Hmmm. Could be. The ground goes from the wiper (arm and pivot) to the housing via whatever path is lowest resistance- yes, the spring is one path , but it does not seem optimized as the ground "contact". It's just a steel spring, no copper plating, no smooth contact surface, etc. But the actual pivot pin is solid brass, and makes pretty solid contact with the housing and cover via the pivot pin holes. But I just went back and sandpapered the ends and inner ID of the spring- can't hurt, could help.
Tom
SRQJeff
Bronze Level Sponsor
The most important thing I found was that the biggest contact problem is NOT where the wiper contacts the resistance wire, but in the ground contact. If I connect my ohmmeter from the connector - where the wire harness connects to the sender - and the long float arm, I get reliable and steady readings. But if I move the ohmmeter lead to the housing, where the system ground connection normally is made, no matter how solid and clean a connection I make to the housing, the readings are very erratic. This tells me that the problem is where and how the wiper makes contact to the housing.
This is EXACTLY right. I just got mine working the same way. You pry up the three tabs holding the case on the unit then lift it off. If you remove the float from the arm, you can thread the arm through the hole and remove it. You then gently sand the brass bushing that fits into the case hole, then clean the hole by poking a little bit of sandpaper into it and turning it until it's shiny. Works beautifully now.
By the way, when I put my meter on the resistance wire at various points, it reads from about 2 kohms to almost a dead short, depending on the position. You get a little more resistance when you measure from the case.
Note that the advice that you need to unbolt the tank before removing the sending unit isn't necessarily true. On mine, I got it out by tapping one of the three little ears on the retaining ring with a screwdriver and rubber mallet (counterclockwise) until it turned and came off. I then lifted the unit out while pulling it toward the front of the car and turning it this way and that to get it to clear the hole.
Finally, if the rubber gasket is in fairly decent shape, you may be able to make it pliable and usable again by soaking it in water overnight. Worked for me.
While you're digging around back there, you might want to replace the hose that runs between the tops of the two tanks. Mine was pretty well shot.
P.S. I don't think the spring is intended as an electrical connection. I think it just maintains a constant pressure between the wiper and resistance wire.
Jeff, I think if you had a more accurate meter and measured just between terminal and case as the arm moves you'd see that the resistance goes from about 10 or 20 ohms to about 250 Ohms. 28 Ohms should read Full, and under 10 Ohms should peg the needle. 250 ohms should read 0 , and 1000 or more should read off scale below zero, about same as with the key OFF.
Nice to know we can get to the sender without removing the tank.
Tom
Nice to know we can get to the sender without removing the tank.
Tom
SRQJeff
Bronze Level Sponsor
Jeff, I think if you had a more accurate meter and measured just between terminal and case as the arm moves you'd see that the resistance goes from about 10 or 20 ohms to about 250 Ohms. 28 Ohms should read Full, and under 10 Ohms should peg the needle. 250 ohms should read 0 , and 1000 or more should read off scale below zero, about same as with the key OFF.
Nice to know we can get to the sender without removing the tank.
Tom
I dunno. It's a cheap-ass Radio Shack meter that measures only in kohm. But I don't see how it could be off by that much. It's pretty accurate for other measurements. I've got another meter around here somewhere. I'll try to dig it up and do a comparison. But even if it's totally wrong, it did confirm that moving the arm causes a smooth change in resistance, which is what we want.
Jeff, It's not critical. I suspect you were making a poor connection when you were contacting the wire with the test lead. I just wanted to be sure no one saw your post and then later measured and found his was about 250 and was thinking he had a problem. Instead of measureing on the resistance wire just measure from terminal to case and move the float arm from min to max.
Tom
Tom
SRQJeff
Bronze Level Sponsor
All valid and true. But if your meter is as crappy as mine, you might try this alternative method. Take two wires with alligator clips at each end and attach one to the terminal on the sending unit and the other to the lever. Connect the other ends to the inputs on a theramin. If you can play "Smoke on the Water" by moving the lever, the unit is in good shape. If it produces something that sounds like the guy who fiddles with turntables in a hip-hop band, you still have problems.
snamelc
Donation Time
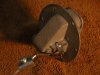
I used a braided copper wire from an old distributor to make a solid ground. I drilled and tapped for a #6-32 screw into the housing on one end and clamped the other to the float arm. This way, I'll never have to worry about getting ground through the pivot. My gas gage now indicates rock solid... no jiggling or twitching as before.
Bill
Bill
Attachments
Mike, I am 99% sure the speedhut senders are designed to work with Speedhut Gauges, not the original Gauges.
http://www.speedhut.com/shop/c/31:1:3/Fuel-Level-Senders/
Tom
http://www.speedhut.com/shop/c/31:1:3/Fuel-Level-Senders/
Tom
Thanks Tom.
I have keenly followed the sender issue threads as sometimes my fuel gauge reads low for a period of time and then returns to proper level. I suspect it is the grounding issue that has been covered in the SAOCA threads. I'll rehab the sender when I remove the gas tanks for interior coating. Hopefully, I can knock that out this winter.
If there are after market replacement sender units, that would be a good plan B.
Thanks,
Mike