• Welcome to the new SAOCA website. Already a member? Simply click Log In/Sign Up up and to the right and use your same username and password from the old site. If you've forgotten your password, please send an email to membership@sunbeamalpine.org for assistance.

    If you're new here, click Log In/Sign Up and enter your information. We'll approve your account as quickly as possible, typically in about 24 hours. If it takes longer, you were probably caught in our spam/scam filter.

    Enjoy.

First Look at Dash

AlpineII

Donation Time
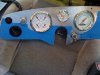
I am having a custom dash made for my V6 project. :DMade of 1/4" aluminum. Still lots to do but here is my first look at it. The small hole above steering wheel is for a 2 1/16" tach. Going with Series I, II and 3 style switch labels and will have ones for fan and sprayer (going with electric pump) and the Series 3 style heater bezel. You can see a place marked out on the right for three more toggles and see some in place on the left. Glove box door is recessed and undercut for a overlapping and close fit and will have chrome pull handle and lock and you can see the metal glove box in the second photo. The tiny black dots on the dash are where the warning lights will be placed. The tach matches the 3 3/8" speedo and quad gauges.
 

socorob

Donation Time
Nice, I just started doing almost the same thing. I'm using 1/8" aluminum. So far I only have the outer shape and glove box door cut out. I'm also using a quad, speedo and 2 1/16 tach, but I have the quad and speedo opposite of yours. Maybe I should swap them like yours somy wife can't see the speedo. I plan on moving my gauges as closeto the column as possible I also plan on using a Saab light switch and hazard switch, and a ford windshield washer/ wiper switch. How are you doing your hinges for the glove boxdoor? Any pictures of it?
 

AlpineII

Donation Time
The hinges come off a volkwwagon glove box and had to have the "curve" stretched out a little to clear the lower dash pad properly. With the 1/4" aluminum we had to machine out the area behind the toggles so that they would clear ok. For the windsheld sprayer I used a micro contact push-button switch that I built into a drilled out Lucas toggle switch. Since I will have a round perspex label ala Series I, II and 3, this will give it a matching appearance to the rest of the controls.
 

socorob

Donation Time
Finally got to work on my dash this weekend, very similar to yours.
 

Attachments

  • dash.jpg
    dash.jpg
    61.1 KB · Views: 112

AlpineII

Donation Time
Nice. You know I was thinking of a multi-switch and had looked at a couple but had thought the hole would be too much on the dash. But seeing the way it fits in yours, it doesn't look bad at all. Maybe I should have looked into this further.

All the toggle holes are cut and we are just about to bevel the holes for the mounting screws. Then a bushed polish finish and the clear coat for protection.

Spent a couple of days running around to plastic places and small machine shops to try to get some toggle bezels made up. Then when telling the machinist working on my dash what I was trying to get done he said he can make me up about 30 blanks from a single rod and it would take about an hour of his time. I just have to see if one of those plastic shops will polish and engrave them for me. Of course I will probably end up sitting down with jewelers rouge and doing the polishing by hand. So I will have the four normally available for early series, as available from Kip Motors, plus one for "Blower" and one for windshield "Sprayer".
 

socorob

Donation Time
Thanks. My main goal for doing all this is to open up space in the middle of the dash for a radio, ac or whatever eventually. That's why I got as many multifunction switches as I could find that were easy to install. That's what made me go with 1/8 aluminum, they will pop into it and stay in. It's a lot of extra effort ohming out all the switches and Looking up schematics all over the Internet but I think I've gotten them all figured out. Hopefully I'll be able to finish rewiring the car by tomorrow night to find out.
 

AlpineII

Donation Time
I was trying to accomplish two things: clean up the dash a little so I could look at a sound system and put in a lockable glove box. Centre console is good and very useable but wanted just a little more.

Let me know how the "turn it on" test goes. Are those dolphin gauges?
 

socorob

Donation Time
Those are tpi gauges, with an autometer tach. So far I have the headlights, turnsignals, brake lights, wiper, washer, horn, emergency flashers, fuel pump wired and tested fine. I still need to test the ignition and gauges,and install the distributor, just didnt have time this weekend. I wasted a lot of time trying to hook up the turn signal switch, thinking i had a problem with using a 2 prong flasher for a 3 prong turn signal switch, but after about 2 hours, i took out the taillight housing and found out once upon a time someone cut and spliced the wires and switched the colors come out under the car as going to the taillights. That added a lot of unforseen time. I should be able to finish in half a day. Im upgrading to a mallory ignition, coil and distributor in the process. I left the center of my dash totally empty for a stereo w/gps, or maybe an ac. I was looking at the southern air ( i think) and they have the smallest ac package ive seen so far, But it still might not fit too well. I alsoam putting in a lockable glove box. Ill sort that out after i get it back on the road.
 

AlpineII

Donation Time
You are further down the road than I am. Just doing the last of the work on the Series 3 body before spraying coulour and then I get at it with the new wire nharness and buckets of nuts, bolts and boxes of parst to re-install.


Machinist is not going to be able to get the dash bezels turned. Now playing with some molds.
 

socorob

Donation Time
I thought I would have been finished by now, but still probably have at least a 1/2 day of work to do. I guess I have about 40-50 hours in the rewire so far. That included cutting the holes in the dash, and ohming out and figuring out the wiring for all the multiswitches. I would have never guessed it would have taken this long but the taillight debacle set me back a few hours and I have a dash lighting demon to track down but I think that may be becauseofa bad sending unit. I'll post a picture whenever it's finished.
 

socorob

Donation Time
Before you paint your car you may want to look at your wiring route to the back of the car. I wish I would have done mine a little different. I took all the wires I needed( I ended up being 1 short because I miscounted them after working on it 10 hours straight) and made them long enough to go from my fusebox under the dash to the rear lights. I was trying to keep the wires on the dry side of the car as much as possible. I ran them down by the dimmer switch and along the bottom corner on the drivers side and drilled a hole and put a grommet behind the drivers seat where they go throgh an enclosed area under the car with slot in it. It comes out of there and goes under the car to the taillights. I wish I would have dropped the car back down and looked in the trunk because after it came out of the slot, about a foot later I should have popped back in the trunk there. That way the only wires under the car would have been on the speed sender and backup light switch. That way it could make any future additions or repairs much easier and keep the wires cleaner.
 

Bill Blue

Platinum Level Sponsor
Those are tpi gauges, with an autometer tach. So far I have the headlights, turnsignals, brake lights, wiper, washer, horn, emergency flashers, fuel pump wired and tested fine. I still need to test the ignition and gauges,and install the distributor, just didnt have time this weekend. I wasted a lot of time trying to hook up the turn signal switch, thinking i had a problem with using a 2 prong flasher for a 3 prong turn signal switch, but after about 2 hours, i took out the taillight housing and found out once upon a time someone cut and spliced the wires and switched the colors come out under the car as going to the taillights. That added a lot of unforseen time. I should be able to finish in half a day. Im upgrading to a mallory ignition, coil and distributor in the process. I left the center of my dash totally empty for a stereo w/gps, or maybe an ac. I was looking at the southern air ( i think) and they have the smallest ac package ive seen so far, But it still might not fit too well. I alsoam putting in a lockable glove box. Ill sort that out after i get it back on the road.

Old Air makes an in the dash unit I put in my car. They call it the Hurricane and is a heater, AC and defroster, all in one. It is a tight fit and requires removing the stock heater and modifying the dash supports. I also had to use 1 1/2" hoses, the 2" provided just took up too much room.

Bill
 

socorob

Donation Time
Last yr at cruisin the coast several of the aftermarket ac vendors were out there selling the units. The smallest by only about 1/2 inch on all dimensions was a place out of Texas. It was something like southern or hot rod air. I'll have to find my papers. I wish they had one more square so you could just sit it on the tunnel and make a console to cover it. One of them had the sanden comp that had the lines coming straight out the back for low hoods.
 

socorob

Donation Time
By the way, how did you modify the dash supports, to go down and around the ac unit or something along those lines?
 

weaselkeeper

Silver Level Sponsor
Did any of you look at Vintage Air units? I'm considering that, but haven't put the tape measure to work yet. Thanks,
 

Bill Blue

Platinum Level Sponsor
By the way, how did you modify the dash supports, to go down and around the ac unit or something along those lines?

The model I purchased has the line hookups high on the side of the unit. They interfered with with the brace nearest the cubby, so I cut away and reinforced the bottom portion of that brace. I don't feel that I lost much. A unit with rear openings might work better, but I'm sure they present their own "opportunities".

About the best a fellow can do is make a cardboard the size of the desired unit and see if it will fit the available space. I decided there was not enough room behind the dash for any of the long rectangular types. But I am sure I did not know of the Hotrod Air unit. I will say this, its tight in there.

Bill
 
Top