
-
Welcome to the new SAOCA website. Already a member? Simply click Log In/Sign Up up and to the right and use your same username and password from the old site. If you've forgotten your password, please send an email to membership@sunbeamalpine.org for assistance.
If you're new here, click Log In/Sign Up and enter your information. We'll approve your account as quickly as possible, typically in about 24 hours. If it takes longer, you were probably caught in our spam/scam filter.
Enjoy.
You are using an out of date browser. It may not display this or other websites correctly.
You should upgrade or use an alternative browser.
You should upgrade or use an alternative browser.
SV V6 Restoration
- Thread starter Beamin
- Start date


Stormbringer
Donation Time

Stormbringer
Donation Time


Charles Johns
Donation Time
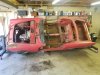
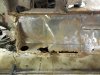
Looking at this Sunbeam I am reminded just how lucky we are in the South to not deal with winter salt, snow, lots of rainy days, and COLD! When I sold my 32 Ford coupe back in 76 to a cop from Lincoln Nebraska, he was adamant about me having the car's original TEXAS title...which I did. Most of the cars I built just needed a little phosphoric acid brushed on then rinsed off, then a little paint or undercoating. You guys don't even have metal in places.
And where we have metal, it is often suspiciously thin. That brings forth an almost unanswerable question "How thin can this panel be and still be safe?"Looking at this Sunbeam I am reminded just how lucky we are in the South to not deal with winter salt, snow, lots of rainy days, and COLD! When I sold my 32 Ford coupe back in 76 to a cop from Lincoln Nebraska, he was adamant about me having the car's original TEXAS title...which I did. Most of the cars I built just needed a little phosphoric acid brushed on then rinsed off, then a little paint or undercoating. You guys don't even have metal in places.
I hate rust.
Bill
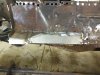
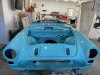
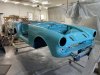
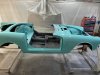
Well, I’m making progress. Media blasted to bare metal. LOTS of new metal welded in place. Rust encapsulated internal frame paint applied. Seams caulked. Epoxy primed. Lizard skin sprayed on the interior. Filler applied and block sanded. Got enough epoxy primer left in the can to hit it again, then a high build primer, more sanding, and hopefully paint by the end of the month.


Aladin Sane
Diamond Level Sponsor
Looking good.


Aladin Sane
Diamond Level Sponsor
Nice. I wish I had taken the front assembly off of mine at some time it has been sitting in the paint shop so I could have finished a similar referb. Yours looks great.
It just can’t ever be easy, can it??
Got the front suspension assembly positioned fairly easily. Three bolts installed, no problem. Last bolt feels like its about to tighten up, then frees up…starts to get snug, then spins. Appears as if I’ve got stripped threads on one of the rear attachment points.
Hopefully I can find a 1/2-20 helicoil kit in town somewhere, then drop the front assembly and hope I can make the repair. GRRRRRRR…
Does anyone happen to know the depth of the mounting hole for the rear bolt on the cross member? Multiple helicoil options are available online…figured I could place the order now and get it on its way. It’ll probably be a day or two before I can get around to dropping the front suspension to check.
Andy,Does anyone happen to know the depth of the mounting hole for the rear bolt on the cross member? Multiple helicoil options are available online…figured I could place the order now and get it on its way. It’ll probably be a day or two before I can get around to dropping the front suspension to check.
I truly doubt the threads need replaced and, rather, I suggest the first twist of threads may have gotten slightly pulled when the crossmember was removed. This is typical once the final bolt is being removed and the weight of the cross yanks the bolt out just a bit before its ready.
I suggest you try to turn the offending bolt by finger into the frame once the cross is out and, if it binds, look for damaged/dirty threads in the hole or on the bolt. It's more likely the threads just need dressed.
It the bolt screws in without the cross in place, its likely you have an alignment issue (IMO, this is your problem). I hope you have another set of hands helping you since this is really difficult alone (even with a jack). BTW, a little oil helps, too.
Mark ..... v
False alarm! I just went out and cranked on the ratchet a couple more times and it tightened right up. Seemed like I turned on that last bolt FOREVER last night and wasn’t getting anywhere. Perhaps as others mentioned, it just wasn’t lining up quite right at first and took a whole lot of turning before the threads actually engaged. Or perhaps the close proximity of the beer fridge resulted in a lapse in judgement. Regardless, now I’m on to the back end. Thanks for all the advise!
I did find my method of positioning the front suspension to be pretty damn easy. I had tires mounted and the whole unit was sitting on wheel dollies. Rather than try to raise the cross member up to the car, I lowered the car down to the cross member. I’ve done it the other way before and remember it being a rather exciting solo project. Working by myself last night, it only took about an hour to get the suspension positioned and bolted in place, and that was apparently with a decent beer buzz…
I did find my method of positioning the front suspension to be pretty damn easy. I had tires mounted and the whole unit was sitting on wheel dollies. Rather than try to raise the cross member up to the car, I lowered the car down to the cross member. I’ve done it the other way before and remember it being a rather exciting solo project. Working by myself last night, it only took about an hour to get the suspension positioned and bolted in place, and that was apparently with a decent beer buzz…