• Welcome to the new SAOCA website. Already a member? Simply click Log In/Sign Up up and to the right and use your same username and password from the old site. If you've forgotten your password, please send an email to membership@sunbeamalpine.org for assistance.

    If you're new here, click Log In/Sign Up and enter your information. We'll approve your account as quickly as possible, typically in about 24 hours. If it takes longer, you were probably caught in our spam/scam filter.

    Enjoy.

V6 tune up tips

NorCal

Silver Level Sponsor
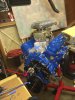
Tomorrow is the day I drag this Alpine back to my cramped garage. My first order of business, after getting it registered, will get the car on the road. It hasn’t been driven in 10-15 years, but I did see it start off a gas can and I was able to engage the clutch forward and backward.

Here is what I’ve been able to grab off the interweb:

Plugs motocraft AGR42, 34 gap
Points. 27 gap
Dwell 35-41
Idle 650
Timing 12 degrees btdc
Max timing 35 degrees btdc
Firing order 142536. (123 on left looking at engine, disti rotates clockwise)

Does that look right? Which side of the engine should I hopefully find the pointer that hasn’t been removed? Any tips on tuning the V6?
C7CB9A8C-D7A0-4034-9162-37B6EC549AC5.jpeg
 

DanR

Diamond Level Sponsor
20190329_194509.jpg
Here's a PIC that will show the 2.8 V6 Timing pointer at the end of my finger.

It is mounted on the Timing Cover with two metric bolts

Please note that the PIC showing the "pointer" does not have the Crank or the Harmonic Balancer installed in this engine block. The Block is for mock-up purposes only.
 

Attachments

  • 20190329_194456.jpg
    20190329_194456.jpg
    225.6 KB · Views: 44

DanR

Diamond Level Sponsor
NorCal, DO you have any of the documentation on your V6?

What cam is installed? If you do not have a clue, try all of the stock specs such as valve adjustments (set kinda loose at first) and timing settings from a FORD Shop Manual. Closely watch the oil pressure. DO NOT LET IT RUN HOT!
 

DanR

Diamond Level Sponsor
The year of your engine can be determined by looking just behind the distributor and number 3 cyl
As in the PIC, the "6" is Jun and "83" is year. 2.8 V6 Cologne Engine Code Markings   20170321_112539.jpg
Also, prior to "83" the Cologne Engines had smaller dia cam journals.

The '83-'86 Ranger/Bronco II and some Aerostar's had the larger dia cam journals, said to be better engines for that reason. However, I have not found that so called improvement to make a difference in any of my early V6 performance.
 

DanR

Diamond Level Sponsor
The reason Not to run your engine hot is because the early heads do not have adequate cooling passages between the exhaust valves.

The link below will give you an idea of how to modify yours if and when you ever tear down the engine. That is if it has not already been accomplished.
 

Attachments

  • 2.8 V6 FORD HEAD Water passage Modification ~1.pdf
    1.4 MB · Views: 18

Alpine 1789

SAOCA President
Diamond Level Sponsor
Thanks for sharing this, Dan! I've seen it described many times, but never fully 'got it' until I saw the photos. Now I know exactly what to do when the time comes for my MII engine.
 

phyrman

SAOCA Secretary
Diamond Level Sponsor
When you find your timing pointer, paint is a brute contrasting color, I usually use yellow paint
Also, color in the timing marks on the damper pulley!!!
 

DanR

Diamond Level Sponsor
Thanks for sharing this, Dan! I've seen it described many times, but never fully 'got it' until I saw the photos. Now I know exactly what to do when the time comes for my MII engine.

Jim, The water cooling passages AND the emission ports below the exhaust ports.... Remember, I discovered if you plug them, drill and tap 10 mm 1.5 you can knotch the header flanges and secure the bottom from any future exhaust leakage.

I do my Straightback headers for my customers and I did Allan Ballards jose style headers for him.

NorCal, In case you are not aware, one of our members, Jose, better known as V6 Jose is considered an expert on the 2.8 V6 Cologne Engine. Look for some of his POST and perhaps you can gain some insight to the inner workings of the Conversion.
 

Alpine 1789

SAOCA President
Diamond Level Sponsor
Jim, The water cooling passages AND the emission ports below the exhaust ports.... Remember, I discovered if you plug them, drill and tap 10 mm 1.5 you can knotch the header flanges and secure the bottom from any future exhaust leakage.
Pictures, Dan! I need pictures!
 

NorCal

Silver Level Sponsor
Jim, The water cooling passages AND the emission ports below the exhaust ports.... Remember, I discovered if you plug them, drill and tap 10 mm 1.5 you can knotch the header flanges and secure the bottom from any future exhaust leakage.

I do my Straightback headers for my customers and I did Allan Ballards jose style headers for him.

NorCal, In case you are not aware, one of our members, Jose, better known as V6 Jose is considered an expert on the 2.8 V6 Cologne Engine. Look for some of his POST and perhaps you can gain some insight to the inner workings of the Conversion.

I’ve read quite a bit, including Jose’s materials.

Done deal, Alpine is in the garage. Somethings better than I remember, others worse. 40404EC4-FA32-46D3-8542-CECF72B70A69.jpeg
 

DanR

Diamond Level Sponsor
Jim, Here are a few PIC's with the emission ports showing in several different stages.

The "plugs" used to fill the holes (drill and tap the emission holes at the same angle as the current hole). HEADEX~1.JPG

Use the Plug to fill the hole then grind smooth with the face of the exhaust surface. 1st PIC shows the emission holes plugged and smooth.V6 Head for 2.8 Cologne Engine   20151209_111409.jpg

Next step is utilize a good exhaust gasket to mark the new header bolt holes. Then, drill straight into the head same as the other header mount holes 10 mm 1.5 approx 3/4" deep. 2nd PIC show one of the emission holes drilled and tapped for 10mm 1.5 threads.2.8 V6 Head emmission port modification by DanR     20161104_095751.jpg
 

DanR

Diamond Level Sponsor
NorCal, When you have time, could you please send me some PIC's of the area around your radiator. I'm seeing what I think is the Mounting for the radiator has been removed at least in part.... I am very much interested in being able to get another inch or so clearance between the radiator and fan in a Project I have.
 

DanR

Diamond Level Sponsor
Thanks for the PIC's.... That makes me wonder what kind of stress is or could be placed upon the radiator?

I may attempt to do something similar.
 
Top