• Welcome to the new SAOCA website. Already a member? Simply click Log In/Sign Up up and to the right and use your same username and password from the old site. If you've forgotten your password, please send an email to membership@sunbeamalpine.org for assistance.

    If you're new here, click Log In/Sign Up and enter your information. We'll approve your account as quickly as possible, typically in about 24 hours. If it takes longer, you were probably caught in our spam/scam filter.

    Enjoy.

Rear axle inner sludge guard

spudman5

Donation Time
I'm re-assembling the rear axle on my SV and I have a question about the inner sludge guard.

The outer sludge guard is pressed into the axle housing and I never removed it during disassembly so I know it is still there.

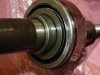
I have a question about what the inner sludge guard looks like. I never removed the bearings from the axle so I think the inner sludge guard is still on the axle. However, I can't find any good pictures to compare with my assembly to verify this.

I have attached a picture of the inner side of the axle bearing. I assume the inner sludge guard is either the thick ring on the axle shaft or the larger donut that is between the think ring and the bearing and has the wire spring wrapped around it.

I will appreciate it if someone can verify which piece is the inner sludge guard. Or if I'm missing it, what does it look like?

As a 2nd question, when I bought the paper gaskets (from SS) that go between the brake backing plate and the dust cover, I was told I needed both the .006" and the .010" gaskets. Do I use both of these together or does one go on each side of the backing plate or ?

Thanks,
Mike
 

Attachments

  • bearing.jpg
    bearing.jpg
    85.3 KB · Views: 45

RootesRacer

Donation Time
I have never heard of there being a "sludge guard" but I dont have an SV.

The smaller ring on the axle is the bearing retainer.
The larger I would have called an oil slinger, the earlier cars have one too and its purpose is to keep oil from flooding the bearings on hard cornering.
SV bearings are sealed so not sure why they would need that?
 

67Survivor

Donation Time
Hi Spud,

I just replaced a broken axle on my seriesV. The bearing was pressed off of the old axle so that I could reuse the sludge guard on the new axle. There was no separate piece that I could relate to the inner sludge guard shown in the workshop manual. My old bearing had the spring that you could see, but none of that came apart and became an inner sludge guard. If I am not mistaken, there were two different bearings that came on the seriesv, one sealed and one not sealed. This may be where the difference lies. I put the outer sludge guard on and then pressed on the new sealed bearing from SS. She drives just fine with no new or unhappy noises.
As for the paper gaskets; When I removed my old assembly, there were no gaskets at all, but there was some RTV gasket making material between the backing plate and the where it bolts onto the rear end (flange?) as well as between the backing plate and the dust cover. I was convinced that I only used one paper gasket when I reassembled mine, but I just went to see which gasket I had 2 of, and I only have one of each left.... so the evidence indicates that I installed one of each size. I THINK, that I simply used Ultra Copper high temp gasket maker between the backing plate and the rear end, but I put a thin layer of ultra copper onto both sides of the .010 gasket and placed it between the backing plate and the dust cover. The workshop manual only shows one location for gaskets on a seriesV, but it does use the plural of gasket, again indicating that maybe one of each should be used... I only put one gasket in there, and have had no issues. Having said that, I have only put about 70 miles on her since I did that repair earlier this month.
I did take photos as I did the repair, but I don't see any of them really being helpful at this point.

I hope this helps,
Rob
 

spudman5

Donation Time
Rob,

Then it sounds like my set up is the same as yours and I have all the parts.

I tried installing one of the axles back into the housing and it appears that the bearing to housing fit is very tight and will take some pressure to push it in. I don't want to press on the end of the axle in fear it my slide inside the bearing. I assume the correct procedure would be to press on the outer ring of the bearing. Before I install the axles into the housing and have to press the bearings into the housing, I want to see if you have any advice.
Did you use a bearing press or did you fabricate something?

Thanks,
Mike
 

67Survivor

Donation Time
Hi Mike,
When I pushed mine it, it was tight as well, seemingly because of the rubber outer seal. Once it started to go in, it popped right in. I had this same experience when trying to pull the old axle out... seemed tight and then just let go and slid out easily.
Because I was replacing the axle and bearing as well, I had a friend with a shop press the new bearing on for me. we pressed it on until it was a few millimeters short of perfect placement and then I let the nut that holds the hub on squeeze it in the last few mils for a perfect fit. If you have not removed the bearing from the old axle, it should still be on very tight and therefore no real fear of it sliding on the axle. If your bearing seems to be loose on the axle, you may want to look into why it is loose and whether it should be replaced before reassembly.
Also, remember to turn the axle as you are sliding it in so that the splines can mesh. If it is not lined up, it will not go in.
Good luck
 

67Survivor

Donation Time
Here is a link to my photography website. This should take you right to the gallery with the rear axle photos. most of the Alpine photos on the site are just crappy Iphone shots, but I figure a lot of them might be good for reference until I get around to taking some better photos with the real camera.

http://www.artisanimages.ca/Cars/Sunbeam-Alpine/Rear-Axle-Assembly/

You will see a photo in there of the broken axle, next to the removed bearing, the sleeve that retains the bearing and under that sleeve is the sludge plate sitting flat on the counter. It just fits between that collar and the bearing. If you never removed your bearing, it is what appears to be the side of the bearing, but is actually just a large washer.
 

spudman5

Donation Time
Rob,

Thank you for the pictures, this is a great help!

The broken axle in your pictures looks nasty. I hope no one driving the car when that happened.

Your pictures verified that my inner sludge guard is still installed.
I was able to get one of my axles pressed into the axle housing. I used a 2" galvanized pipe coupler I picked up at the hardware store as a bearing driver on the outer ring of the bearing. It didn't take much force so I'm sure it is the o-ring that causes the additional force needed to press in the axle. However, after getting the axle almost all the way in I saw the o-ring sticking out of the housing. It appeared the o-ring slipped out of the grove and was wedged between the housing and the bearing. So I had to pull the axle back out. I discovered that the o-ring did stay in the grove and what happened was a very thin outer layer of the o-ring was shaved off and that is what was wedged between the housing and the bearing. I could have left the axle in the hub and the seal would probably have been fine. But, now I was able to give Sunbeam Specialties some additional cash flow and I get more practice on removing and installing the axles.

Since I now get to re-start the installation process, I will try and remember to take pictures while doing the install for future reference for myself or others. I always intend to take lots of pictures and usually forget. I've thought that if wore a go-pro camera, that would be the idea way to video installation or tear-down of something. Of course it would need post editing to remove the words I might utter when smashing my knuckle or things don't go well. I need to see if I can borrow one from someone and test out that theory.

Thanks,
Mike
 

67Survivor

Donation Time
Yeah, the broken axle could have been a lot worse than it was. I managed to miss all of the parked cars and with no oncoming traffic, got her stopped without any serious complications. Deep breath, fix axle, enjoy car.
I think that if you are going to push against the brearing you are better off pushing on the inner race as close to the center(axle) as possible. The inner race is attached directly to the axle and is solid between the outer portion and the inner, whereas the outer race is attach through the ball bearings etc. and could take some damage from sideways pressure. I just tapped on the end of the axle as I turned the axle to line up the splines. I did use some gear oil to prelube the shaft, the splines and probably the bearing. The same oil I use in the rearend. I'm also a homebrewer, so the end of a project is always a bit foggy, but I'm sure I would have coated the outer edge of the bearing. Good luck.
 
Top