DanR
Diamond Level Sponsor
The young one in the family says we're setting the engine in the Harrington this weekend.View attachment 14870
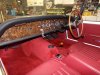
I'd like to see the "other side" of this setup
")

Welcome to the new SAOCA website. Already a member? Simply click Log In/Sign Up up and to the right and use your same username and password from the old site. If you've forgotten your password, please send an email to membership@sunbeamalpine.org for assistance.
If you're new here, click Log In/Sign Up and enter your information. We'll approve your account as quickly as possible, typically in about 24 hours. If it takes longer, you were probably caught in our spam/scam filter.
Enjoy.
The young one in the family says we're setting the engine in the Harrington this weekend.View attachment 14870
What other side????I'd like to see the "other side" of this setup
Dan,The "Y" hose connection in the water pump looks like one I found in some of my stuff!
A look at your engine does not show where it is routed?
Did you "keep" it in use? If so, where does the hose(s) go to?
 the tube on the back of the intake into the water jacket around #4 cylinder. This photo of one of my other cars may help.
I have to agree that a RHD car complicates getting to some things on the right side of the engine due to the brake and clutch masters being on the right side plus being a LeMans it has a C/D booster which required Harrington to move the horn from the frame rail to the scuttle brace. Not much room to work.Just to clarify.. Its actually the factory correct location for series I/II. It might be the reason they relocated to the scuttle brace on series 3 onwards.
But the location makes it a real PITA to polish the rocker cover behind the bracket
There is a hose hooked to the bottom of the Y that runs to the fitting on the intake manifold which allows water to pass thru the intake and
Dan,Got it! The "Y" had me thinking...

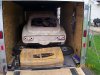
 dash which I didn't use. I made a trip to Reno to pick up the car.